Quick start
In this guide, we will provide an example token swap of 0.1 1INCH for DAI at the best possible rate on the market.
This process includes:
This example uses Binance Chain network; however, it can be replicated on any network supported by 1inch Aggregation Protocol.
Checking allowances
Step 1: Set Up Your Environment
First, import the necessary Node.js libraries and set up your environment variables.
const Web3 = require('web3'); // Import the Web3 library for interacting with Ethereum
const fetch = require('node-fetch'); // Import the fetch library for making HTTP requests
const yesno = require('yesno'); // Import the yesno library for prompting user input

const chainId = 56; // The chain ID for the Binance Smart Chain (BSC)
const web3RpcUrl = 'https://bsc-dataseed.binance.org'; // The URL for the BSC node you want to connect to
const walletAddress = '0x...xxx'; // Set your wallet address (replace '0x...xxx' with your actual wallet address)
const privateKey = '0x...xxx'; // Set the private key of your wallet (replace '0x...xxx' with your actual private key). NEVER SHARE THIS WITH ANYONE!
Step 2: Define Your Swap Parameters
Next, define the parameters for the swap you want to perform.
const swapParams = {
    fromTokenAddress: '0x111111111117dc0aa78b770fa6a738034120c302', // The address of the token you want to swap from (1INCH)
    toTokenAddress: '0x1af3f329e8be154074d8769d1ffa4ee058b1dbc3', // The address of the token you want to swap to (DAI)
    amount: '100000000000000000', // The amount of the fromToken you want to swap (in wei)
    fromAddress: 'YOUR_WALLET_ADDRESS', // Your wallet address from which the swap will be initiated
    slippage: 1, // The maximum acceptable slippage percentage for the swap (e.g., 1 for 1%)
    disableEstimate: false, // Whether to disable estimation of swap details (set to true to disable)
    allowPartialFill: false, // Whether to allow partial filling of the swap order (set to true to allow)
};
- For complete swap parameter descriptions, see this page.
amount: '100000000000000000': This value is used because 1INCH token has 18 decimals as part of the ERC-20 token standard. Learn more.
Step 3: Define API URLs and Initialize Web3 Libraries
Now, define the API URLs and initialize Web3. Web3 is a collection of libraries which allow you to interact with a local or remote Ethereum node, using HTTP, IPC, or WebSocket.
const broadcastApiUrl = 'https://tx-gateway.1inch.io/v1.1/' + chainId + '/broadcast';
const apiBaseUrl = 'https://api.1inch.io/v5.0/' + chainId;
const web3 = new Web3(web3RpcUrl);
Step 4: Define Helper Functions
Define a series of helper functions that will be used to interact with the 1inch API.
// Construct full API request URL
function apiRequestUrl(methodName, queryParams) {
    return apiBaseUrl + methodName + '?' + (new URLSearchParams(queryParams)).toString();
}

function checkAllowance(tokenAddress, walletAddress) {
    return fetch(apiRequestUrl('/approve/allowance', {tokenAddress, walletAddress}))
        .then(res => res.json())
        .then(res => res.allowance);
}
Step 5: Check Token Allowance
Use the checkAllowance function to check the current allowance of the token.
const allowance = await checkAllowance(swapParams.fromTokenAddress, walletAddress);
console.log('Allowance: ', allowance);
At this point, you'll have set up your environment, defined your swap parameters, defined your API endpoints, and checked the allowance for the token you are selling.
If you haven't previously approved or swapped this asset using 1inch Aggregation Protocol, then > Allowance: 0 will be displayed in the console.
This means that the 1inch router does not have access to swap this token within your wallet.
Creating the token allowance (approval) transaction
In order for the 1inch aggregation protocol to access tokens in your wallet, you must create an approval transaction. This specifies that the 1inch router is allowed to swap a specific amount of the token chosen.
Approval transactions require payment of a blockchain gas fee! This amount is deducted in the form of native tokens from your wallet.
Step 1:
Similar to the Allowance Check, you'll first need to set up your environment, define swap parameters and API endpoints, and initialize Web3 libraries.
const Web3 = require('web3');
const fetch = require('node-fetch');
const yesno = require('yesno');

const chainId = 56;
const web3RpcUrl = 'https://bsc-dataseed.binance.org';
const walletAddress = '0x...xxx'; // Set your wallet address
const privateKey = '0x...xxx'; // Set private key of your wallet. Be careful! NEVER share this key with anyone!

const swapParams = {
    fromTokenAddress: '0x111111111117dc0aa78b770fa6a738034120c302', // 1INCH
    toTokenAddress: '0x1af3f329e8be154074d8769d1ffa4ee058b1dbc3', // DAI
    amount: '100000000000000000', //18 decimals (in gwei)
    fromAddress: walletAddress,
    slippage: 1,
    disableEstimate: false,
    allowPartialFill: false,
};

// API endpoints
const broadcastApiUrl = 'https://tx-gateway.1inch.io/v1.1/' + chainId + '/broadcast';
const apiBaseUrl = 'https://api.1inch.io/v5.0/' + chainId;
const web3 = new Web3(web3RpcUrl);
Step 2: Implement Helper Functions
Implement helper functions to interact with the 1inch API, including constructing the API request URL, broadcasting raw transactions, signing and sending transactions, and preparing approval transactions considering the gas limit.
// Construct full API request URL
function apiRequestUrl(methodName, queryParams) {
    return apiBaseUrl + methodName + '?' + (new URLSearchParams(queryParams)).toString();
}

// Post raw transaction to the API and return transaction hash
async function broadCastRawTransaction(rawTransaction) {
    return fetch(broadcastApiUrl, {
        method: 'post',
        body: JSON.stringify({ rawTransaction }),
        headers: { 'Content-Type': 'application/json' }
    })
        .then(res => res.json())
        .then(res => {
            return res.transactionHash;
        });
}

// Sign and post a transaction, return its hash
async function signAndSendTransaction(transaction) {
    const { rawTransaction } = await web3.eth.accounts.signTransaction(transaction, privateKey);

    return await broadCastRawTransaction(rawTransaction);
}

// Prepare approval transaction, considering gas limit
async function buildTxForApproveTradeWithRouter(tokenAddress, amount) {
    const url = apiRequestUrl(
        '/approve/transaction',
        amount ? { tokenAddress, amount } : { tokenAddress }
    );

    const transaction = await fetch(url).then(res => res.json());

    const gasLimit = await web3.eth.estimateGas({
        ...transaction,
        from: walletAddress
    });

    return {
        ...transaction,
        gas: gasLimit
    };
}
Step 3: Build the Body of the Transaction
Prepare the transaction data for approval using the buildTxForApproveTradeWithRouter function and store it in transactionForSign.
const transactionForSign = await buildTxForApproveTradeWithRouter(swapParams.fromTokenAddress);
console.log('Transaction for approve: ', transactionForSign);
Step 4: Confirm and Send the Transaction
Prompt the user to confirm the transaction using the yesno library. If confirmed, sign and send the transaction. Otherwise, exit without signing.
const ok = await yesno({
    question: 'Do you want to send a transaction to approve trade with 1inch router?'
});

if (!ok) {
    return false;
}

const approveTxHash = await signAndSendTransaction(transactionForSign);
console.log('Approve tx hash: ', approveTxHash);
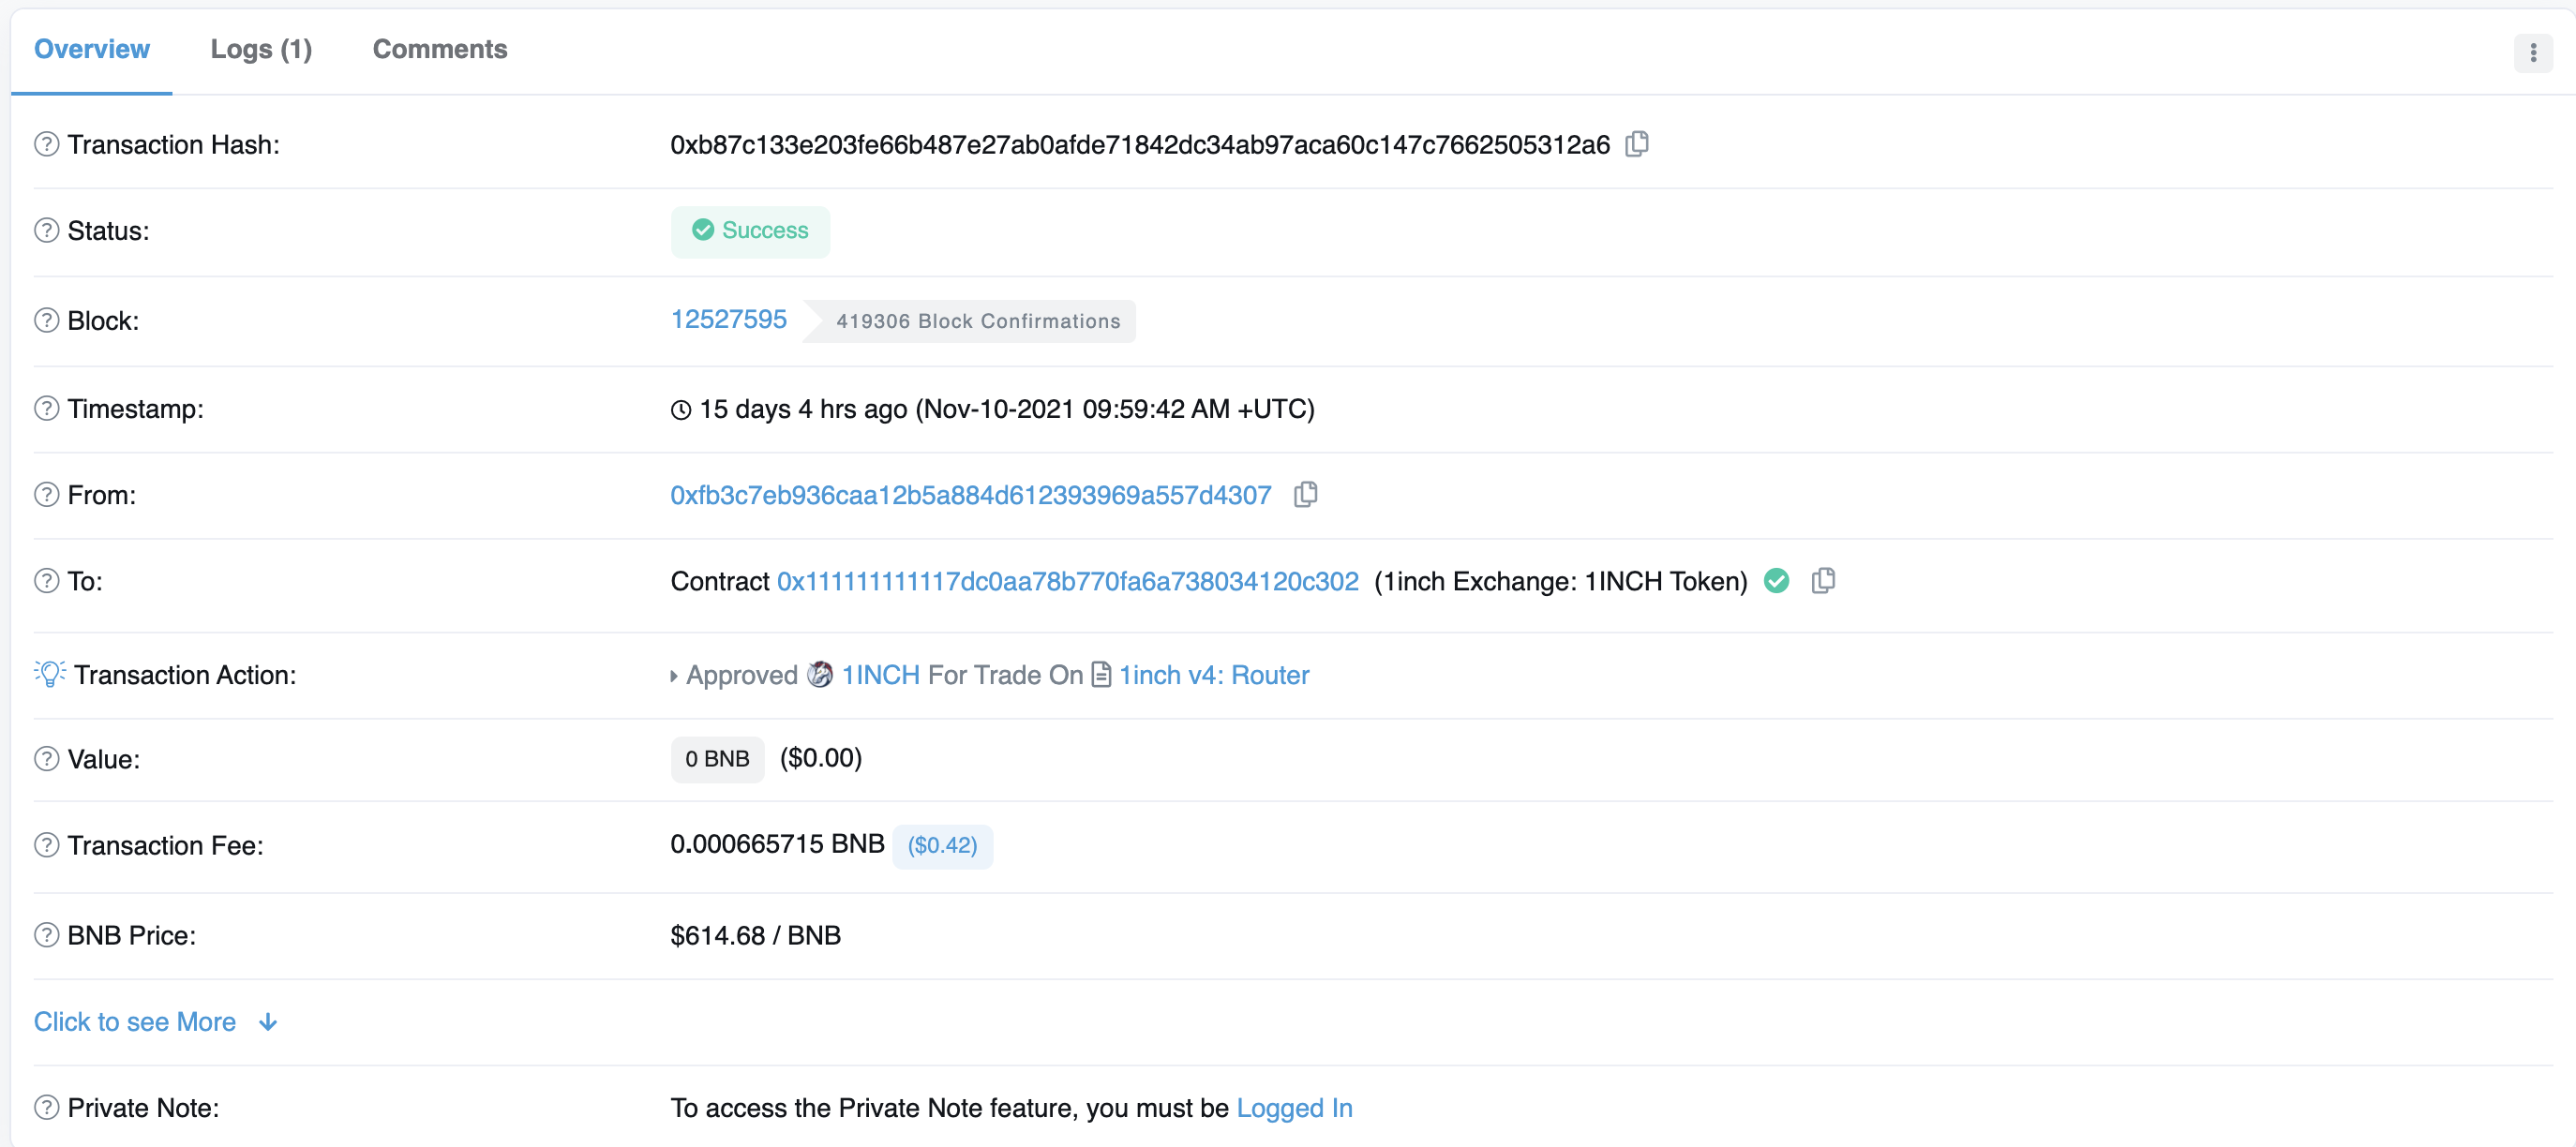
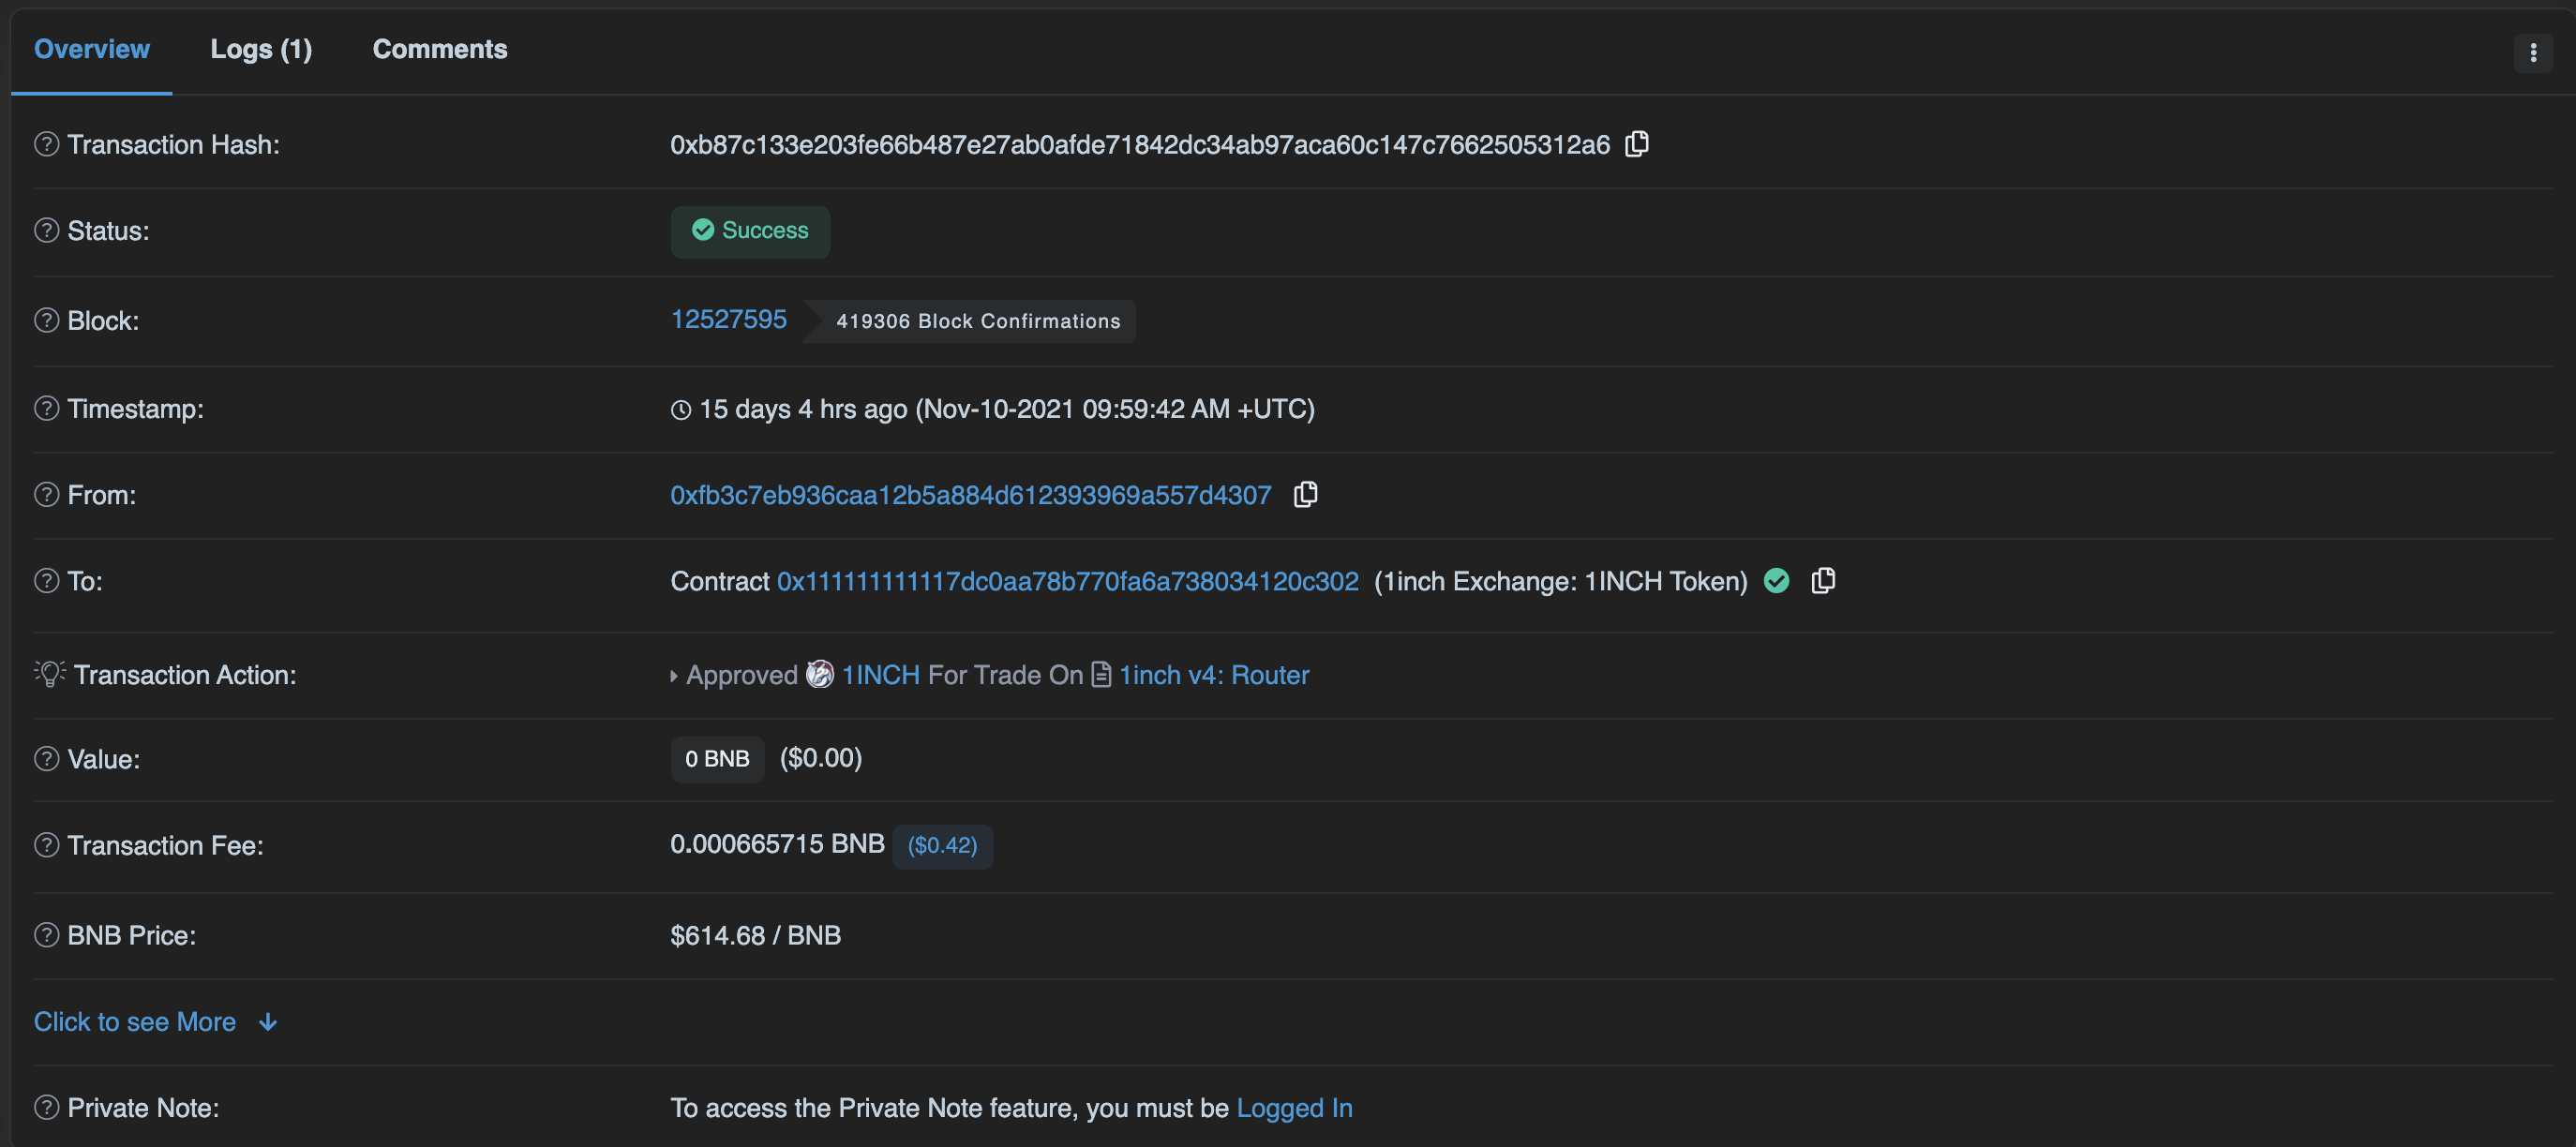
After running this code in the console, you should see something like this:
> Approve tx hash: 0xb87c133e203fe66b487e27ab0afde71842dc34ab97aca60c147c7662505312a6
With the transaction hash, you can monitor its execution using the blockchain explorer.
For the Binance Chain, you can use bscscan.com: https://bscscan.com/tx/0xb87c133e203fe66b487e27ab0afde71842dc34ab97aca60c147c7662505312a6
That's it! At this point, you have checked for token allowances and sent a transaction granting the 1inch router access to your tokens. Next, we will make the swap!
Making the Swap
Before proceeding, please confirm that your approval transaction has a status of Success!
Step 1: Set Up Environment and Define Swap Parameters
// Set up environment and import necessary libraries
const Web3 = require('web3');
const fetch = require('node-fetch');
const yesno = require('yesno');

// Define the chain ID and Web3 RPC URL
const chainId = 56;
const web3RpcUrl = 'https://bsc-dataseed.binance.org';

// Set your wallet address and private key
const walletAddress = '0x...xxx';
const privateKey = '0x...xxx';

// Define the swap parameters
const swapParams = {
    fromTokenAddress: '0x111111111117dc0aa78b770fa6a738034120c302', // 1INCH
    toTokenAddress: '0x1af3f329e8be154074d8769d1ffa4ee058b1dbc3', // DAI
    amount: '100000000000000000',
    fromAddress: walletAddress,
    slippage: 1,
    disableEstimate: false,
    allowPartialFill: false,
};
Step 2: Implement Helper Functions
// Define the API endpoints for broadcasting and interacting with 1inch
const broadcastApiUrl = 'https://tx-gateway.1inch.io/v1.1/' + chainId + '/broadcast';
const apiBaseUrl = 'https://api.1inch.io/v5.0/' + chainId;

// Create a new instance of Web3 using the provided RPC URL
const web3 = new Web3(web3RpcUrl);

// Construct the full API request URL based on the method and query parameters
function apiRequestUrl(methodName, queryParams) {
    return apiBaseUrl + methodName + '?' + (new URLSearchParams(queryParams)).toString();
}

// Post a raw transaction to the 1inch API and return the transaction hash
async function broadCastRawTransaction(rawTransaction) {
    return fetch(broadcastApiUrl, {
        method: 'post',
        body: JSON.stringify({ rawTransaction }),
        headers: { 'Content-Type': 'application/json' }
    })
        .then(res => res.json())
        .then(res => {
            return res.transactionHash;
        });
}

// Sign and send a transaction using the provided private key
async function signAndSendTransaction(transaction) {
    const { rawTransaction } = await web3.eth.accounts.signTransaction(transaction, privateKey);

    return await broadCastRawTransaction(rawTransaction);
}
Step 3: Build the Body of the Transaction
// Prepare the transaction data for the swap by making an API request
async function buildTxForSwap(swapParams) {
    const url = apiRequestUrl('/swap', swapParams);

    // Fetch the swap transaction details from the API
    return fetch(url)
        .then(res => res.json())
        .then(res => res.tx);
}

// First, let's build the body of the transaction
const swapTransaction = await buildTxForSwap(swapParams);
console.log('Transaction for swap: ', swapTransaction);
Step 4: Confirm and Send the Transaction
// Prompt the user to confirm the transaction before signing and sending it
const ok = await yesno({
    question: 'Do you want to send a transaction to exchange with 1inch router?'
});

// Confirm that all parameters are specified correctly before signing the transaction
if (!ok) {
    return false;
}

// Sign and send the swap transaction, and retrieve the transaction hash
const swapTxHash = await signAndSendTransaction(swapTransaction);
console.log('Transaction Signed and Sent: ', swapTxHash);
After running this code in the console, you should see something like this:
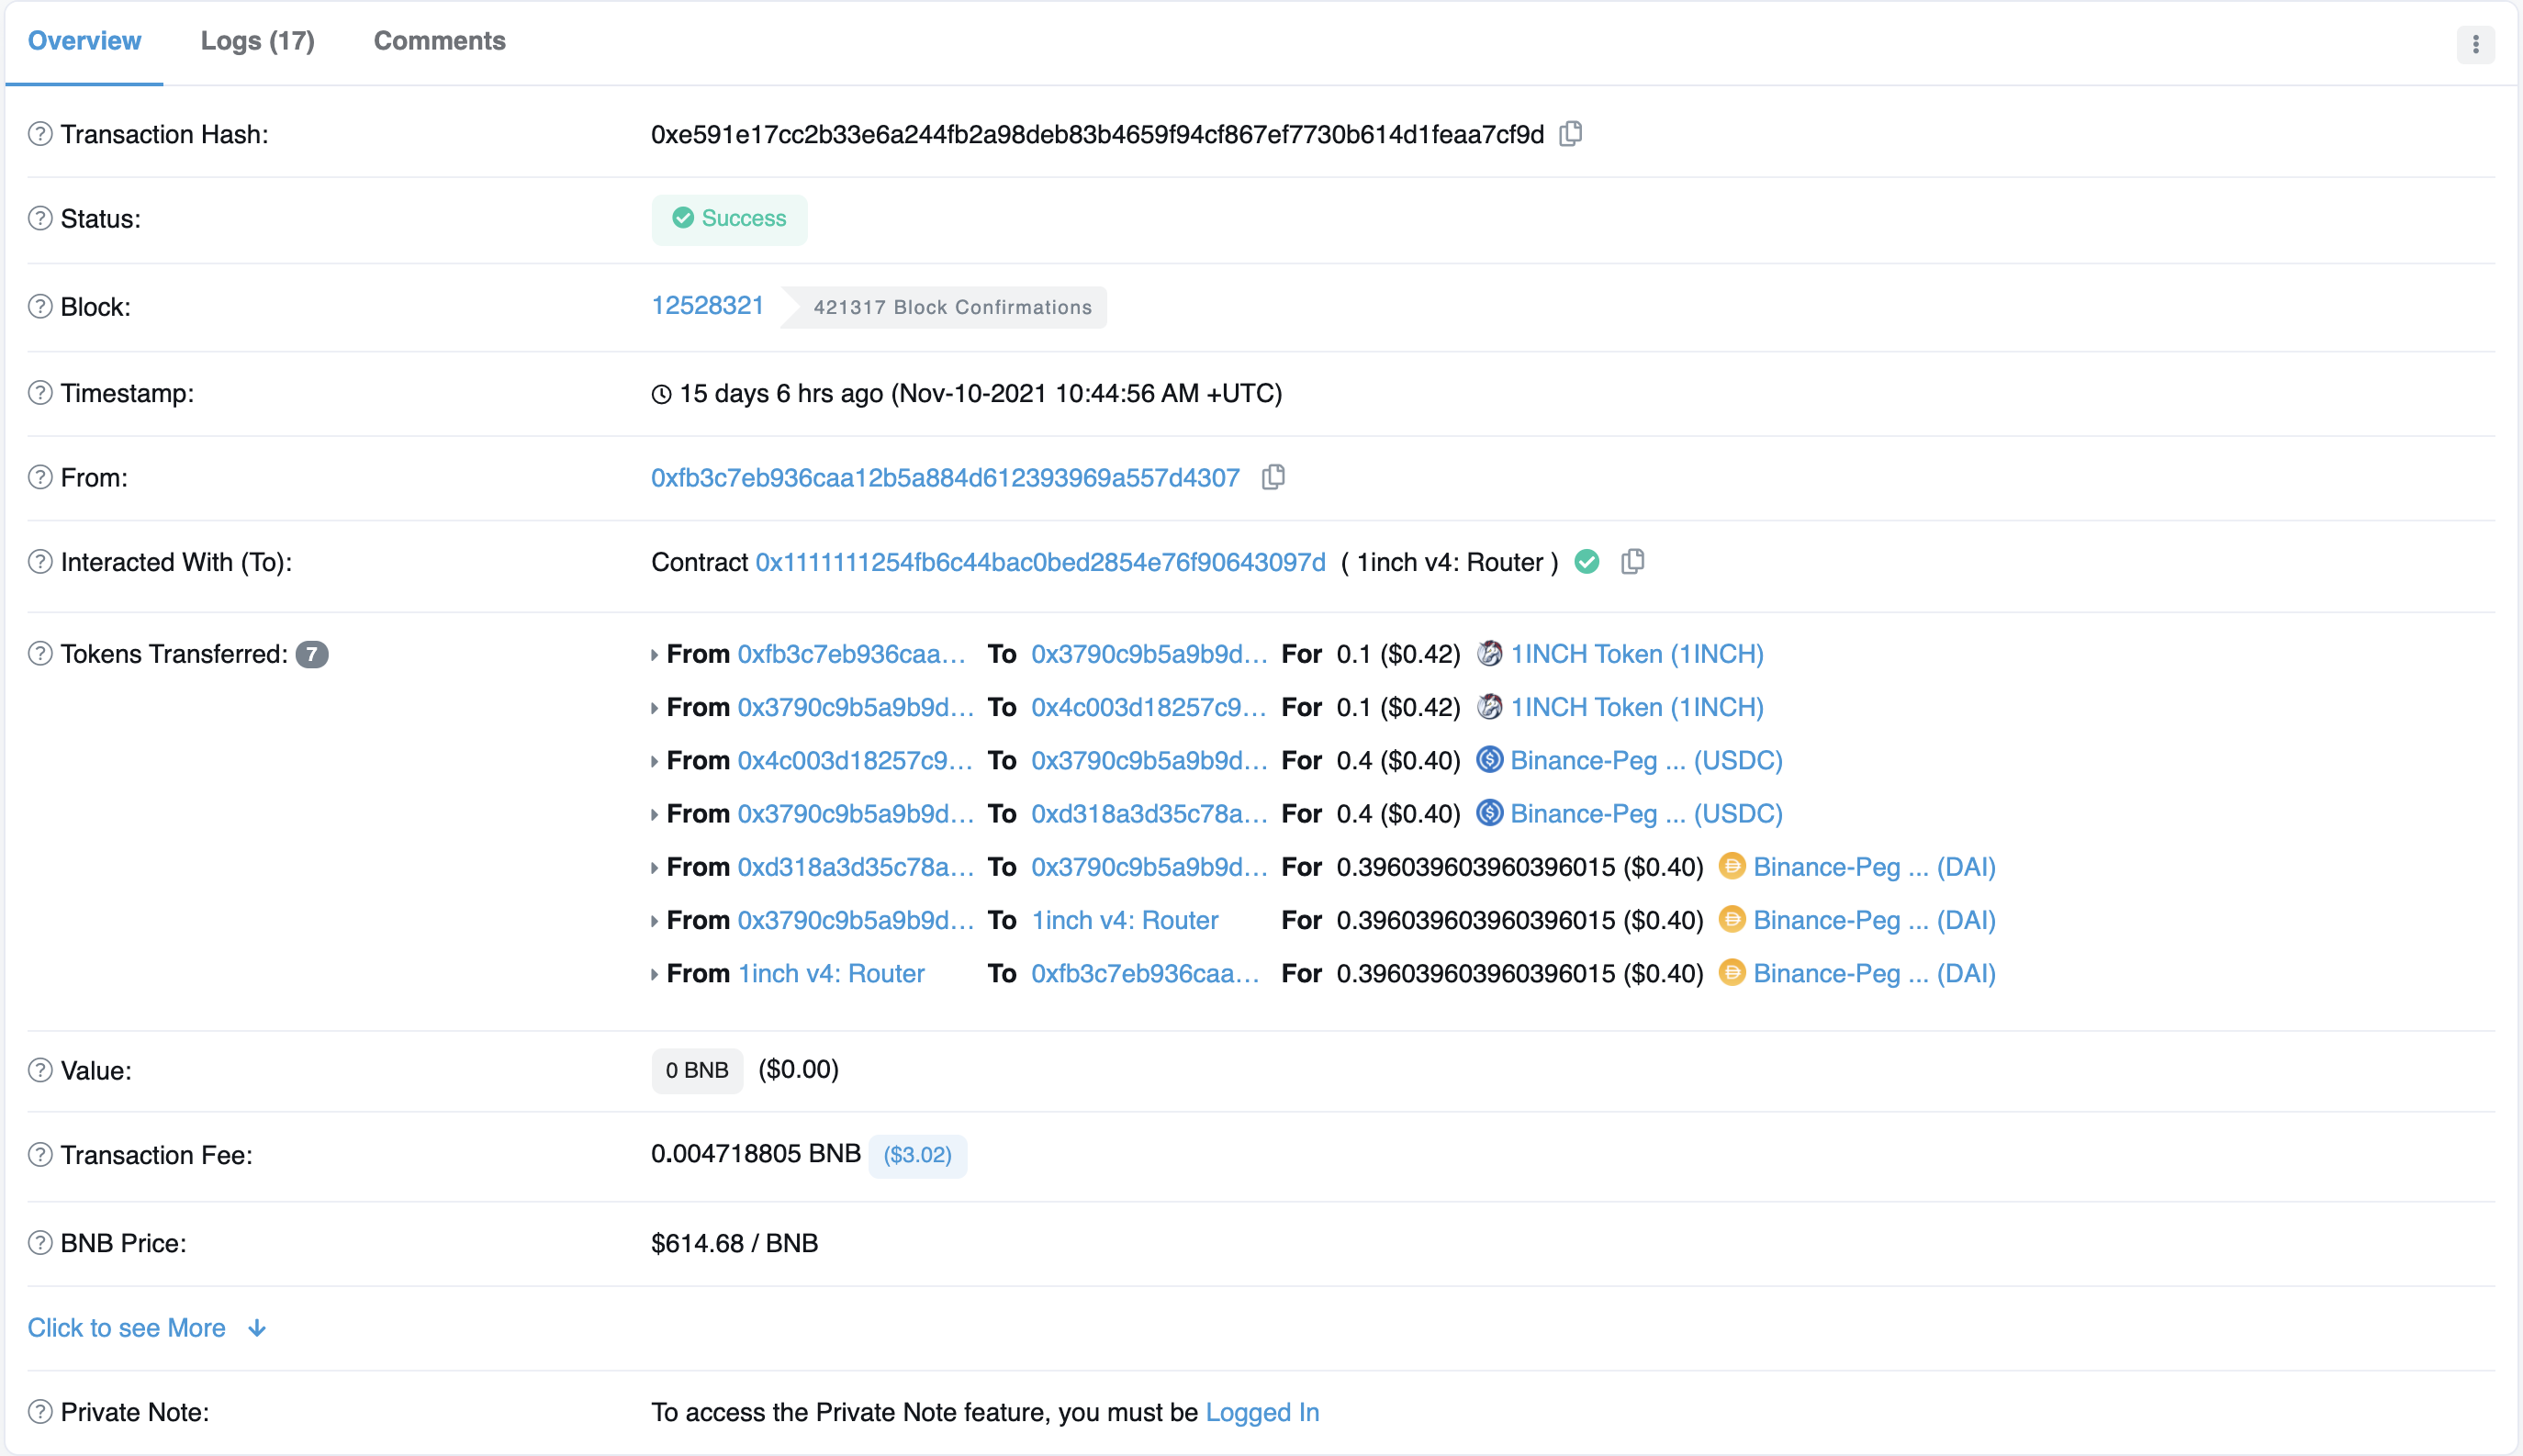
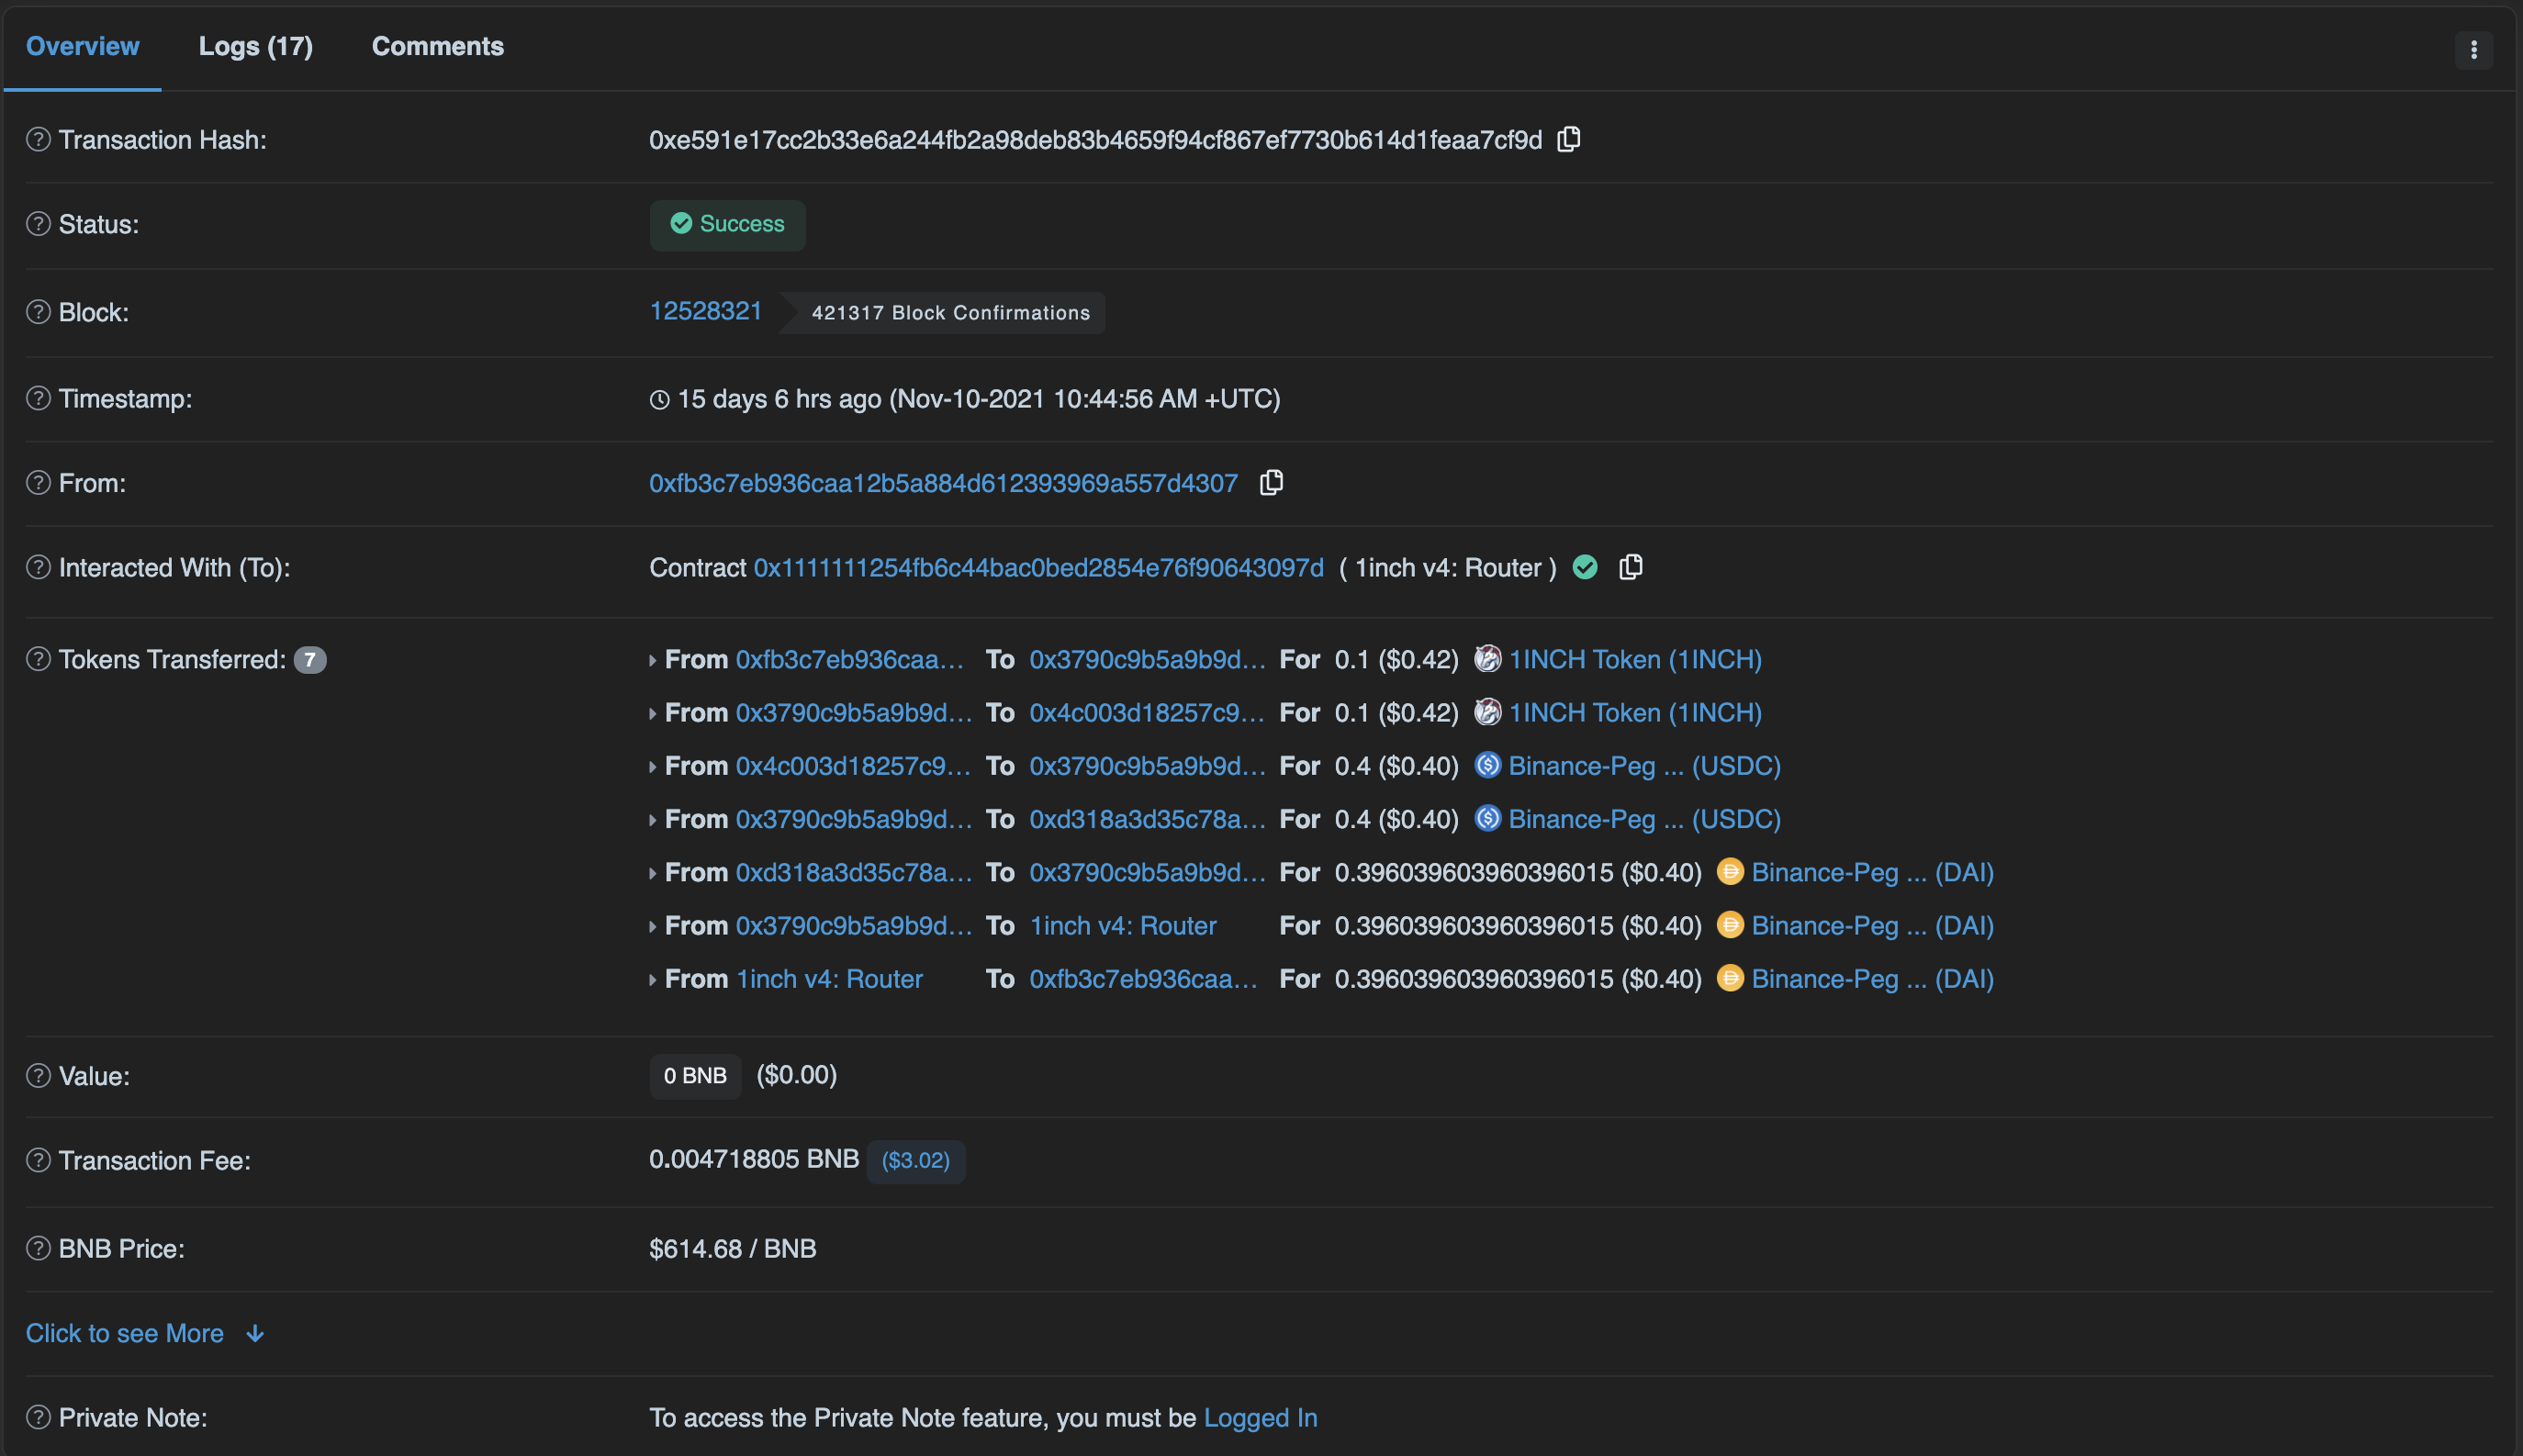
> Swap tx hash: 0xe591e17cc2b33e6a244fb2a98deb83b4659f94cf867ef7730b614d1feaa7cf9d
Let's check the result of the transaction on the explorer: https://bscscan.com/tx/0xe591e17cc2b33e6a244fb2a98deb83b4659f94cf867ef7730b614d1feaa7cf9d